Auto Mask Pro
This effect analyzes the color information in your footage or visuals and isolates specific RGB values that you select. Most color masking tools treat black, white, and shades of gray as saturation levels of a color. But my plug-in sees all color values - including black, white, and grays - as distinct colors themselves.
Works from Arena: 7.17 onwards.
This means you can mask and isolate blacks, whites, and grays in addition to fully saturated colors. The Color Range parameter acts as a grayscale range control when you select a black, white or gray value.
Let's look at the parameters:
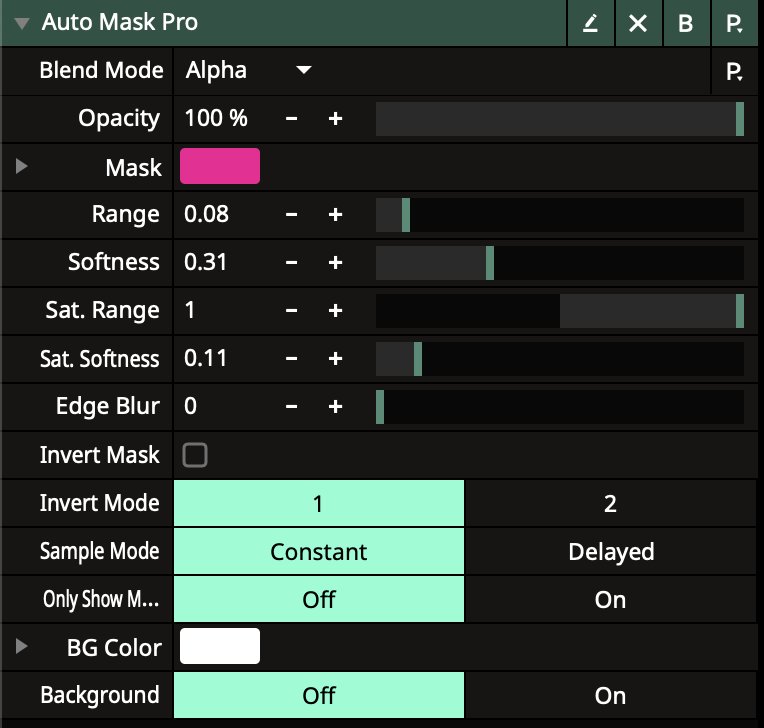
- Mask lets you select the RGB value you want to mask using the eyedropper, color picker, or HSV/RGB sliders. This will be the color that gets removed.
- Range controls the range of similar colors that also get masked around the selected color. A lower value masks fewer colors while a higher value will mask more colors similar to your selection.
- Softness lets you control the softness of the mask's edge. A lower value will give you a harder edge, while a higher softness blends the mask edge.
- Sat. Range and Softness work the same way but for the saturation of colors rather than the colors themselves.
- Edge Blur lets you blur the edges of the mask.
- Invert Mask simply inverts the mask so the selected color is kept rather than removed.
- Invert Mode gives you a couple options - isolate just the selected color/value, or isolate it while keeping all grays if masking a color, or keep all colors if masking a gray value.
- Sample Mod e Constant samples constantly like the name suggests, deleted will only sample color data after movement stops, avoiding unwanted changes during playback or when using the eyedropper tool
- Only Show Mask, This parameter causes the plug-in to only show the black and white (grayscale) mask.
- Background On/Off lets you turn on or off a solid color background behind the masked area.
- And Background Color sets the color of that background, so you can pick any color you want to show behind the mask.
Let's see how to use this:
To use the Auto Masking plug-in, simply add it to a layer in Resolume. Then, select the color or grayscale value that you want to mask using the Color to Mask parameter. You can use the eyedropper tool, the color picker, or the HSV/RGB sliders to select the desired color or grayscale value.
Once you have selected the color or grayscale value to mask, you can adjust the other parameters to achieve the desired effect. For example, you can increase the Color Range parameter to mask a wider range of colors or grayscale values, or you can increase the Mask Softness parameter to create a softer mask edge.
Here are a few examples of how you can use the Auto Masking plug-in to create visual effects:
- Isolate a subject from the background: You can use the Auto Masking plug-in to isolate a subject from the background by masking out the background color. To do this, simply select the background color using the Color to Mask parameter. Then, adjust the Color Range and Mask Softness parameters to achieve the desired effect.
- Create high-contrast black-and-white images: You can use the Auto Masking plug-in to create high-contrast black-and-white images by masking out all of the gray values in the image. To do this, simply select a gray value using the Color to Mask parameter. Then, set the Color Range parameter to almost 1. This will mask out all of the gray values in the image, leaving only the black and white values.
- Create creative color effects: You can use the Auto Masking plug-in to create creative color effects by masking out specific colors or grayscale values in your footage. For example, you could mask out the blue sky in a video to create a day-to-night effect. Or, you could mask out the green screen in a video to replace it with a different background.
The Auto Masking plug-in is a versatile tool that can be used to create a variety of visual effects. By experimenting with the different parameters, you can create unique and interesting looks for your footage.
Enjoy! and have fun!

